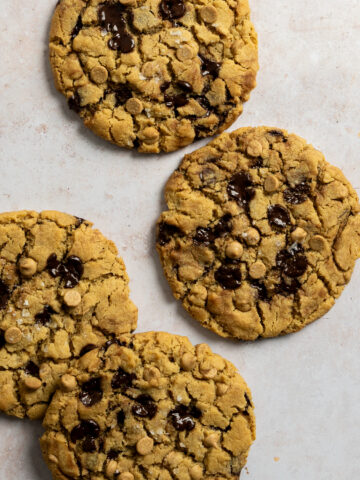
This is sort of a two part post. One for these deeeeeelicious gluten free pumpkin snickerdoodle cookies and one for MY own personal holiday cookie baking tips. I will alternate pictures of said cookies with my baking tips. First off a picture of these cookies:
 Yum right? Soft, spicy, pumpkiny cookies. There are two types of snickerdoodles, poofier, soft cake-like and the flatter, crispier kind. I prefer the poofier cookies. I prefer any cookie really. These cookies are poofier. That's enough poofy for one blog post.
Ok, so now I will go into some of my cookie baking tips. The other night on Twitter, Beth from the lovely blog, Kitchen Mage, had asked who was baking and what? So I responded with my Christmas baking list ( in like 4 posts to her) and she replied with "Whoa! That's impressive. You are one of the 'crazy' people" We then went on to have a conversation about baking and any tips I may have for an upcoming blog post of hers on how to prep/bake ahead of time or any shortcuts for the crazy baking season. I wrote out SO many that I decided to make it into a blog post here, as well as she will feature some on her blog soon too. So without further adieu, here are my tips in no particular order, nor are they the right or fastest way to do things, just my way and whats been working for me for years. I still end up feeling rushed and scrambled to get all my baking in ( so doesn't help that I keep discovering so many new amazing cookies each year and my list grows and grows)
So here is:
Shanna's Cookie Baking Tips: How to save time for the crazy holiday baking season when you're an overachiever like me and bake at least 10 kinds of cookies plus other goodies.
1. Double, triple and quadruple check ingredients before starting any bakeathons in your kitchen. Make sure you have more than what you will actually need in case any disasters happen like recipe fails, oven fires or family members eat all the cookies and you need to make more
2. HOARD butter like no other. Every time you are at the store, buy a pound of butter and find space in your freezer. Buy an extra freezer just for butter if needed. Just hoard it. I would die ( not really) if there was a butter shortage come holiday baking season. Along those lines stock pile sugar, buy all the vanilla extract, invest in 50lb bags of flour, order a pallet of flour, look on Pinterest to find something cool to make with the pallet later. Nothing is worse than being all set up to make a recipe and being OUT or almost out of a crucial ingredient like brown sugar that you need RIGHT NOW and you have a sleeping toddler who decides to take a marathon 3 ½ hour nap that day right into the dinner hour so you put your butter that/s been thawing all day back into the fridge hopefully to thaw again the next day to make the cookies after you make your husband pick some up on the way home from work at night. So, yeah, make sure you are well stocked and well organized. Make a list of ALL the ingredients you need for all your recipes and add a package or two more of each. Always better to have more than not enough. Especially butter.
3. How about another picture of these lovely gluten free pumpkin snickerdoodles?
 Again. Yum right?
4. Check sales, end caps of store aisles, coupons in newspapers, online coupon sources and store mailers. It's big time baking season and everyone is doing it so most if not all stores have specials and sales and killer deals on ingredients, so why not save a little money as you begin you annual holiday baking supply hoarding?
5. Mise en place. That's a fancy French term meaning "everything in place". This is what saves time. Have everything weighed, measured, portioned out before starting a recipe. This helps so you know you have not only enough ingredients, but so things don't get overmixed becuase you waited to measure out the flour as the butter has been beating the eggs to death for 10 minutes. So be your own prep cook/baker and set it all up.
6. Butter. It needs to be room temp for most recipes, if not all. Wintertime is COLD and butter does not thaw fast at all. Don't and I repeat DON'T thaw in the microwave. Its uneven heating, part could melt, and it could end up exploding and then you have precious butter dripping from the top of the microwave. So instead set your butter out the night before if you remember to do so. If not, set it out as early as you can AND cut the butter into tablespoon sized pieces. Cut up butter thaws way faster than whole sticks. If you are really in a bind and needed thawed butter like 10 minutes ago, use a box cheese grater and shred the butter over a bowl. That thaws the fastest. Just be careful of shredding fingers.
7. One more than more cookie pics. To get eggs to room temp fast, place in a bowl and pour warm water over them. Change the water out once or twice and they should be good to go in 5-10 min. They won't cook, unless you have your hot water heater set to boiling and if that's the case, turn down the heat on that thing. OUCH!
 I had a hard time finding cookies to stay stacked, they kept falling over, none were balancing for very long so I am stoked I got one that wasn't blurry, before they fell. Again.
More of my cookie baking tips:
8. To really save time, set out resealable baggies and measure out all your dry ingredients for all your cookies way ahead of time. Label and date. Keep cool, like in the freezer if you have the space. This is great especially when you are baking several types of cookies in one day you have all your premade "mixes" of dry ingredients ready to go and you don't have to spend lots of time on baking day measuring out. Just carefully pour into a bowl and whisk gently to remix in case some ingredients settle since not all have the same weights.
9. Most cookie dough freezes just fine. Depending on the type you can store it wrapped tightly with plastic wrap and then in a resealable baggie (labeled and dated of course) or roll into a log and wrap and baggie OR scoop into balls ( if doing drop cookies like these gluten free pumpkin snickerdoodles) and flash freeze on a parchment lined baking sheet and then place the preformed cookie balls into a baggie. That way they are ready to bake when you are. Cookie dough never fully freezes rock hard so you can set them out while you are preheating your oven and setting out your baking sheets and cooling racks. Some types that are preformed ( like the snickerdoodles or sugar cookie cut outs) can be baked frozen. The only cookie doughs ( I believe I may be wrong so don't quote me) that don't freeze well are more liquid type doughs like macarons and Madeleines. Those need to be made same day. Same with meringue cookies
10. Sugar cookies. Time consuming right? Don't have to be. This is a dough that can be made a head of time and chilled. When you roll the cookies out, what I do, is I roll right onto my silicone bake mat, cut them out evenly spaced and remove the excess dough. This way they are already on the bake sheet, and the delicate cookies don't have to be transferred from cutting surface to sheet to risk being misshapen or broken. Freeze on the cookie sheets and then bake or save the frozen cut out cookies, carefully, in a baggie, and bake when ready on a different day. You can also cut out on parchment paper if you don't have silicon mats and cut the parchment in a square around the cookie and slide it from cutting area to baking sheet so it has its own little surface that you carry it on, and again, don't have to worry about breaking the cookie. This way you can handle one at a time and place on the baking sheets easily.

I have been making this pumpkin snickerdoodle recipe for a couple years now. This is the first time I made them gluten free. I have had so much success with my gluten free all purpose flour mix with cakes and cupcakes I figured why not try them in these cookies? So glad I did. Total success. At least I think so. And my husband too.
Almost through my baking tips.
11. If you are crazy ambitious and think to save time bake ahead of time. Like WAY ahead of time. Cookies, once baked and cooled, can be wrapped in plastic wrap, and in resealable baggies ( two even if you want) and frozen up to 3 months and still taste just as fresh. Labeled and dated. I may do this one year. If I remember. Oh and try not to eat them all before December.
12. Cookies that require decorations, like sugar cookies, or toppings, like thumbprints, can be frozen after baking until ready to finish decorating. Allow to thaw to room temp before icing and decorating.
 My husband liked this pic best. He said " that picture says that cookie in front is mine. Its the one in focus, its the one you are looking at and not the others. Thats the one you want to eat. Actually that's the one I want to eat." ha ha
13. Invest in silicone bake mats and have several, more than the number of cookie sheet that you own ( or same number if you wish) that way when one batch is baking you can prep the next batch on another silicon mat and have it ready to slide onto the cookie sheet once its cool enough for the next batch. Which brings me to my next point
14. If you only have one cookie sheet and it takes a while to cool down in between baking batches of cookies, run it under cold water in the sink. This will cool it down quickly and get that next batch of cookies in the oven faster. Wipe down to fully dry and you are good to go. Then go buy more cookie sheets. Use your coupons at Bed Bath and Beyond. So worth having more than one cookie sheet.
15. If you don't have silicon bake mats or find they are pricey ( some brands are more expensive than others but they last forever and are a worthy investment) get several rolls of parchment paper and pre-cut to your baking sheet sizes. This way they are ready to go when its baking time and you don't have to fight the really crappy cutting edge of the box and have the paper roll up on you. Store the cut sheets flat. You can buy pre-cut parchment but its kind of expensive and its easy to cut it yourself. OH a tip my mom just told me when I was there at Thanksgiving was if your parchment rolls up, smear some butter very lightly on your cookie sheet and place the parchment on top. This way the butter acts like a "glue" and the paper stays put. I tried it, worked like a charm
16. Invest in several cookie cooling racks. If limited on space, find some that are stack-able. These are neat and save a ton of counter space which is a commodity in baking season. Its great so you don't have to move cooling cookies from the prior batch to accommodate the new batch and some end up falling off and break although my husband always hopes this happens so he can eat the broken ones. He says he knows I don't want to photograph or give away broken ones. My dad does that to my mom too. Hovers to eat the broken cookies. Men, I tell ya.

Gluten Free Pumpkin Snickerdoodles and Holiday Cookie Baking Tips
Ingredients
- 3 ¾ c gluten free all-purpose flour (my mix
- ½ teaspoon xanthan gum ONLY if the GF flour doesn’t have it
- 2 teaspoon pumpkin pie spice
- 2 teaspoon baking powder
- Pinch salt
- 2 sticks butter room temp
- 1 c pumpkin puree, not pie filling
- ¾ c granulated sugar
- ¾ c packed light brown sugar
- 1 large egg
- 2 teaspoon vanilla extract
- For the topping:
- ¼ c granulated sugar
- ¼ c brown sugar
- 2 teaspoon pumpkin pie spice
Instructions
- In a medium bowl combine GF all-purpose flour, xanthan gum (if needed) salt , baking powder and pumpkin pie spice. Set aside
- In a bowl of a stand mixer cream the butter until light and fluffy about 3 minutes. Add the sugars and beat again another 2 minutes. Add in the egg and mix well. Beat in the pumpkin and vanilla until blended. Slowly add the flour mixture and beat on low until just mixed in. Do not over mix
- Transfer to a smaller bowl, wrap tightly with plastic wrap and refrigerate overnight, at least 8 hours.
- Next day or 8 hours later, preheat oven to 350 deg.F. Prepare cookie sheets with either parchment paper or silicone bake mats.
- Combine the topping ingredients in a small bowl
- Scoop out rounded generous tablespoon sized balls off dough and roll into a smooth ball with your hands. Roll in the topping and set about 2” apart on the bake mats. With the bottom of a smooth drinking glass gently press the balls into a flatter disc. Don’t smash all the way down, just gently press. If the glass sticks, dip in the sugar mixture and press again. If some of the sugar comes off the cookies you can gently lift and place back in sugar mixture and sprinkle it on top and bottom and place back on cookie sheet.
- Bake for 9-11 min, do not over bake. Let cool 5 minutes on pan then cool completely on a wire rack.
- Store in an airtight container up to a week unrefrigerated or keep in an airtight container or baggie in the freezer for up to 3 months.
Notes
I first made these cookies from a recipe I ended up losing and I found this recipe here from Annie's Eats, last year. So this recipe is adapted from hers. Her recipe is awesome if you don't want to go the gluten free route.


Leave a Reply